A Huge Thank You

Thanks for taking the time to visit my Stampin' Up! blog. I would love for you to either leave a comment or follow my blog and then I can come and see your work and leave comments for you too.

Emma xx
Independent Stampin' Up! Demonstrator in England UK. All things Stampin' Up for card making, scrapbooking, wedding stationery, gifts, card making classes, scrapbooking classes, gift making classes.
http://picasion.com/i/1TioE/

Friday, October 30, 2009

Winner of my Blog Candy

Hi Guys

Today is the day for drawing my candy. Firstly I would like to say thank you to all of you who looked at my blog, listed it on their blog and as well to those of you who became followers of my blog. I will now be able to look at your work.

In order to choose my winner I used the random number generator at random.org. I got my hubby to do it to make it even fairer


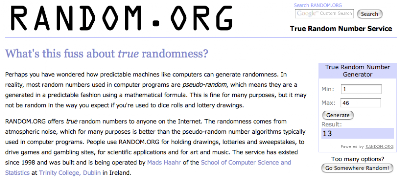
Unlucky for some but lucky for this lady, Number 13 was the number chosen. Going down the list number 13 is JanJ. So Jan email me your address and I will get your goodies posted off to you.

Once again thanks to you all

Until next time

Happy Crafting

Emma xx

Thursday, October 29, 2009

Blog Candy 4000 hits

This post will remain at the top until 29th October. Please scroll down for further posts.


Hi Guys

Well I have promised it for a while but here it is. My blog candy. I am sorry for the delay.


There are some rock - a - blocks, Cosmo Cricket Ribbon, Stampin' Up! Flower Fusion, Doodlebug Sugar Coating and some Kay & Co stickers.

I would like you to post a link on your blog advertising my candy and I will pick a winner by random generator on 29 October.

You will also find some surprise items in the package as well.

Thanks for looking and good luck

Until next time happy crafting

Emma xx

Tuesday, October 27, 2009

Tuesday Taggers - Bursts of Colour


Hi Guys

Well another week has passed and I am not sure where they are going. This week for Tuesday Taggers we were asked for Bursts of Colour. I really didn't want to do the obvious and do fireworks so instead a flash of inspiration came to me on Friday and I sprayed some white card with shimmer sprays that I made with mica powders, re-inker and water.


I punched it with boho blossoms punch from SU! and attached them to some crafting wire which I have twisted round a pencil. My leaves are punched from green card with the 5 petal flower punch also from SU! My plant pot is made from brown card stock and I have used a border punch that has been put through a paper crimper just to add some dimension.

I hope you like and until next time

Happy Crafting

Emma xx

Tuesday, October 20, 2009

Tuesday Taggers - BOO!!


Hi Guys

Well this week on Tuesday Taggers we are looking for all things that go bump in the night. The DT have done some outstanding work again. For my entry though I have not gone the traditional with pumpkins and ghosts.

I have just done some artwork. My card started with me using a background stamp from Mr Tim Holtz that I brayered with gesso and stamped onto the card. When this had dried I then started inking with distress inks peeled paint, spiced marmalade. I then over stamped it with more stamps from Tim (and made a mistake) so out came my book (I bought one just to rip up which people who know me will know that this has taken me such guts to do) and I placed a ripped page on the bit I made mistake on. I then inked this up with more spice marmalade and peeled paint. I went round the edge with vintage photo to darken it up a bit. I free cut a wing from grunge paper and coloured it with distress inks again. I then manipulated it so that it is 3d. Before I attached it I ran my artwork and my wing through the Bigshot with an embossing folder to add the spiders web. I distressed this with an emery board to take the top of the paper off. I used some jump rings and added some charms. The quote at the bottom of the artwork is 'Once a word is spoken, it flies, you can't catch it'. I forgot to say about the candle. I have used an image from Lisa's Altered Art. I then did the same as if you are adding a stamped image to a candle and used some waxed paper around the candle to keep the image in place and then heated it with my heat gun and then it stuck.


As promised tomorrow I will be launching my blog candy, so watch this space.

Until next time happy crafting and I hope you like it.

Emma xx

Tuesday, October 13, 2009

Tuesday Taggers - Digi Week


This week on Tuesday Taggers is slightly diffferent to normal (not that we are normal on TT's). One of the Design Team, Teri, also designs digital stamps (and has a site called Delicious Doodles), so this week we all had the same image a little harvest mouse and we all did something completely different.

Here is my take on the little mouse

I coloured my mouse with a mixture of copic, pro and tria markers and then cut it out. I have coloured the background with Ranger Distress Inks and cut and dry pads. I started with Tattered Rose and went all over the paper. I then used Milled Lavender and Dusty Concord going in a little less in each case. I then blended them by going over with the Tattered Rose again. The stamps are new ones from Stamping Up! called Autumn Days. I have stamped them with Vintage Photo distress ink. I distressed the edge of the card with a thread cutter and then 3d'd them onto the card base. I also used ribbon from my stash to jazz up the side.

I hope you like and until next time

happy crafting

Emma xx

Monday, October 12, 2009

Look at this amazing offer


Blog candy at Crafters Kitchen, only a bloomin' QuicKutz Silhouette up for grabs. How fab is that. All you have to do is link from your blog (they are checking) and enter your name on their blog.

Good luck

Emma xx

Friday, October 2, 2009

More Samples for Sir Stampalot

LONG POST WARNING

I have done some more samples for Sir Stampalot and you can see these on their website along with samples from lots of other hugely talented bods.


This one, above, is coloured in with distress inks by Ranger and a water brush. Although you can't see it very well I have added a bit of bling to his collar with self adhesive gems, the dots on the bag have been accented with glossy accents. The stars have been coloured with sakura gelly roll glaze pen. I have used Daisy Bucket papers and Bazzill card stock to mat and layer the card up. I have used doodlebug rubons for the sentiment.


I have coloured this one with blendable pencils and sansodor mineral oil. I tend not to use blending stumps because when I first started they were very expensive and I could not afford them so a friend of mine showed me how to blend with skewers/cocktail sticks and cotton wool. I twist the skewer into the cotton wool so I have a thin layer on the stick. I then dip this into the oil and get colouring. I will do a tutorial on this in the next couple of weeks. Again I have matted and layered with Daisy Bucket papers, Bazzill card stock and doodled around the edge with a brown pen.


My favourite colouring medium has got to be Distress inks. I didn't start colouring with them until very recently after seeing one of my friends, the lovely Sara (who has yet to get a blog but that will all change very soon), colour with them. I love the effect that they leave and that you can water colour with them, distress with them, edge with them, grunge with them and lots of others that I have yet to discover. Daisy Bucket papers, nesties and bazzill card stock have been used again.


No this one has been coloured with Cosmic Shimmer powders and paints. I have used Daisy Bucket papers and doodling to finish this one off. The ribbon is two pieces, one thin one running along the card and a slightly thicker one to tie the knot. The dots around the image are the card candy sold by craftwork cards.


No this card is coloured with Cosmic Shimmer paints/powders again and it is not the colouring that is the bit that I am really chuffed with on this card but the border around the image. I have used the doily border punch from Martha Stewart in a 12" piece of Bazzill cardstock. I have then ran it through a ribbler/crimper. This then changes the properties of the cardstock and makes it bendable, if that is a word. I then bent it around the circle to give me a border to match my border on the card. I have ruffled my ribbon by pulling a thread from the middle of the ribbon, I then stuck it down with double sided tape. I have made it slightly longer than that of the card as a point of interest.

Sorry for the length of the post but I needed to let you know how I had done all of the different cards and techniques.

So until next time

Happy crafting

Emma xx

Thursday, October 1, 2009

Stampin' Up! Brand New Catalogue

Hi Guys

The new Idea Book and Catalogue has gone live as of today and boy oh boy is there some fabby new stuff in there. I have had some stuff through already and will post some samples in the very near future.

There is a link to the new Catalogue on my sidebar.

Until next time, happy Crafting

Emma xx